When working with the document window, the main menu bar looks as follows:
Windows |
Mac OS |
 |
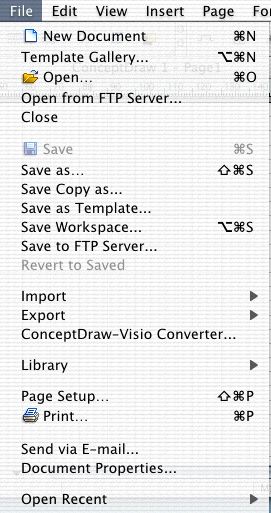 |
The File menu contains commands for working with files - opening, closing and saving files.
 New Document
Creates a new ConceptDraw document.
Template Gallery...
Opens the Template Gallery dialog where you can choose a template
to base a new document on.
For more information read Dialogs - Modal dialogs - Template
Gallery.
 Open
Open
Opens a file.
Open From FTP Server...
Opens a file from an FTP server.
For more information see Internet - Working
with Documents on a Remote FTP-Server.
Close
Closes the active document.
 Save
Save
Saves the document.
For more information see Document - Saving
a Document.
Save As...
Saves the document under a new name.
For more information see Document - Saving
a Document.
Save Copy As...
Saves a copy of the document under a new name.
For more information see Document - Saving
a Document.
Save As Template...
Saves or creates a template file.
For more information see Document - Saving
a Document.
Save Workspace...
Saves or creates a workspace file.
For more information see Document - Saving
a Document.
Save to FTP Server...
Saves a file to an FTP Server.
For more information see Internet - Working
with Documents on a Remote FTP-Server.
Import
Opens a file in a format, other than ConceptDraw.

Import -> Graphic File...
Opens a graphic file (picture).
For more information see Document - Importing
Files.
Import -> Microsoft PowerPoint...
Opens a presentation file in Microsoft PowerPoint format.
For more information see Document - Importing
Files.
Import -> Text Data
In this menu you can choose one of two possible text data formats to import
in ConceptDraw.

Import -> Text Data -> Flow Data Format...
Imports text data in the Flow Data format.
For more information see Document - Importing
Files.
Import -> Text Data -> Outline Format...
Imports text data in the Outline format.
For more information see Document - Importing
Files.
Import -> ConceptDraw XML...
Imports a file in the XML for ConceptDraw format.
For more information see Document - Importing
Files.
Export
The file export menu.

Export -> Graphic File...
Saves the document in a graphic file.
For more information see Document - Exporting a Document- To
graphic formats.
Export -> HTML...
Saves the document as HTML files. You can choose the image type and other export
parameters.
For more information see Document - Exporting a Document - To
HTML - for publishing on the Web.
Export -> PDF...
Saves the document in the PDF format.
For more information see Document - Exporting a Document - To
PDF - for cross-platform viewing and printing.
Export -> Microsoft PowerPoint...
Saves the document in the MS PowerPoint format.
For more information see Document - Exporting a Document
- To PowerPoint - for creating presentations.
Export -> Macromedia Flash (SWF)...
Saves the document in the Macromedia Flash format.
For more information see Document - Exporting
a Document.
Export -> Encapsulated Postscript...
Saves the document in the Encapsulated Postscript (EPS) format.
For more information see Document - Exporting
a Document.
Export -> Text Data
The menu for exporting to a text file.

Export -> Text Data -> Flow Data Format...
Saves the document in the Flow Data format.
For more information see Document - Exporting
a Document.
Export -> Text Data -> Outline format...
Saves the document in the Outline format.
For more information see Document - Exporting
a Document.
Export -> ConceptDraw XML...
Saves the document in the XML for ConceptDraw format.
For more information see Document - Exporting
a Document.
ConceptDraw-Visio Converter...
Opens the Web page of the ConceptDraw-Visio conversion service.
For more information see Document - Exporting
a Document.
Library
The menu for working with libraries.
 Library -> New...
Creates a new library.
For more information see Libraries - Creating
and Editing Libraries.
 Library -> Open...
Opens a library.
For more information see Libraries - Using
Libraries and Library Shapes.
 Library -> Close
Closes the active library.
For more information see Libraries - Using
Libraries and Library Shapes.
Library -> Close All
Closes all open libraries.
For more information see Libraries - Using
Libraries and Library Shapes.
 Library -> Save
Saves the active library.
For more information see Libraries - Creating
and Editing Libraries.
Library -> Save as...
Saves the active library under a new name.
For more information see Libraries - Creating
and Editing Libraries.
Library -> Properties...
Changes the properties of the library in the Library Properties
dialog.
For more information see Libraries - Creating
and Editing Libraries.
Print Page Setup...
Allows to set the printer page parameters in the Page Setup dialog.
For more information see Document - Printing
a Document.
 Print Preview...
Allows to preview the results before printing.
For more information see Document - Printing
a Document.
 Print...
Prints the document.
For more information see Document - Printing
a Document.
Send via E-mail
Sends a document by e-mail.
For more information see Internet - Sending
a Document by E-Mail.
Open Recent
Displays a list of the most recently
opened documents. When you choose a document from the list, the program will
open it unless it was deleted or renamed.
The Open Recent submenu contains
a list of the most recently opened documents. When you choose a document from
the list, the program will open it unless it was deleted or renamed.
Exit (only in Windows)
Exits ConceptDraw.
| Windows |
Mac OS |
 |
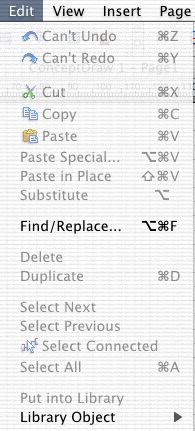 |
This menu contains various commands for editing documents.
 Undo
Undo
Cancels the most recent action. The name of the last action is displayed in
the menu item.
For more information see Shapes - Operations on Shapes - Undo
and Redo.
 Redo
Redo
Cancels the last Undo operation. The name of the last action is displayed in
the menu item.
For more information see Shapes - Operations on Shapes - Undo
and Redo.
 Cut
Cut
Cuts selected text or shapes and copies them onto the Clipboard.
For more information see Shapes - Operations on Shapes - Copying
and Pasting.
 Copy
Copy
Copies selected shapes or text onto the Clipboard.
For more information see Shapes - Operations on Shapes - Copying
and Pasting.
 Paste
Paste
Inserts the contents of the Clipboard into the document.
For more information see Shapes - Operations on Shapes - Copying
and Pasting.
Paste Special
Inserts the contents of the Clipboard allowing to specify the format.
For more information see Shapes - Operations on Shapes - Copying
and Pasting.
Paste In Place
Pastes the shape from the Clipboard into the same relative position on the page,
as it was before being copied.
For more information see Shapes - Operations on Shapes - Copying
and Pasting.
Substitute
Replaces one shape with another one.
For more information see Shapes - Operations on Shapes - Substituting
a Shape with Another Shape.
Find/Replace
Searches / replaces text in the shapes in the document.
For more information see Text - Searching
and Replacing Text.
Delete
Deletes selected shapes.
For more information see Shapes -
Operations on Shapes - Deleting.
Duplicate
Creates a copy of the selected shape.
For more information see Shapes -
Operations on Shapes - Duplicating.
Links
Edits a linked OLE object (Windows only).
Object(Îáúåêò)(òîëüêî Windows)
If an OLE object is selected, the menu for editing an OLE object appears in
place of this item.
For more information see OLE-objects.
Select Next
Selects the next shape in the order they were created.
For more information see Shapes - Operations on Shapes - Selecting.
Select Previous
Selects the previous shape in the order they were created.
For more information see Shapes - Operations on Shapes - Selecting.
![]() Select
Connected
Select
Connected
Selects all shapes, connected to the selected shape with connectors.
If the shapes, connected to the selected shape also have shapes, connected to
them, these shapes are selected as well.
For more information see Shapes - Operations on Shapes - Selecting.
Select All
Selects all shapes in the document.
For more information see Shapes - Operations on Shapes - Selecting.
Put into Library
Puts selected shape(s) into the active library.
For more information see Libraries - Creating and Editing Libraries
- Adding Shapes to a Library.
Library Object
The menu for working with shapes in the active library. This menu is enabled
when there is an open library.
| Windows |
Mac OS |
 |
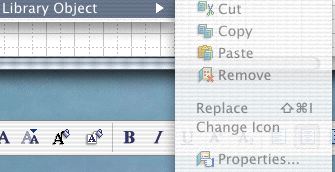 |
 Library Object -> Cut
Cuts the selected library shape and copies it onto the Clipboard.
For more information see Libraries.
 Library Object -> Copy
Copies the library shape onto the Clipboard.
For more information see Libraries.
 Library Object -> Paste
Pastes the shape from the Clipboard into the library.
For more information see Libraries.
 Library Object -> Remove
Removes a shape from the library.
For more information see Libraries.
Library Object -> Replace
Replaces the selected shape in the library with the selected shape in the document
without changing the icon.
For more information see Libraries.
Library Object -> Change Icon
Changes the icon of a library shape.
For more information see Libraries.
 Library Object -> Properties
Edits properties of the library shape.
For more information see Libraries.
Preferences (only Windows)
Calls the Preferences dialog, where you can set parameters
of the application.
In Mac OS X this
item is located in the application menu.
For more information see Dialogs - Modal dialogs - Preferences
and Customizing the Working Environment - Application
Settings.
| Windows |
Mac OS |
 |
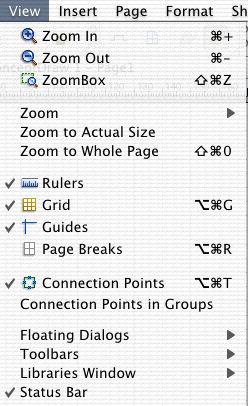 |
This menu controls how the document is displayed, whether to show toolbars, floating dialogs and more.
 Zoom In
Increases magnification.
For more information see Document - Working with a Document - Zooming.
 Zoom Out
Decreases magnification.
For more information see Document - Working with a Document - Zooming.
 Zoom Box
Activates the Zoom Box mode letting you zoom in or out on the needed part of
the page.
For more information see Document - Working with a Document - Zooming.
Zoom
Lets you choose various zoom settings.
Zoom -> 400%
Zoom -> 200%
Zoom -> 150%
Zoom -> 125%
Zoom -> 100%
Zoom -> 75%
Zoom -> 50%
Sets the specified zoom level for the active document window.
For more information see Document - Working with a Document - Zooming.
Zoom -> Last
Sets the previous zoom level.
For more information see Document - Working with a Document - Zooming.
Zoom -> To Page Width
Sets the zoom level so that the page width fits in the document window.
For more information see Document - Working with a Document - Zooming.
Zoom -> To All Objects
Sets the zoom level so that the all the shapes on the page fit in the document
window.
For more information see Document - Working with a Document - Zooming.
Zoom To Actual Size
Displays the document at its actual size (100 % zoom).
For more information see Document - Working with a Document - Zooming.
Zoom To Whole Page
Sets the zoom level so that the entire page fits in the window.
For more information see Document - Working with a Document - Zooming.
 Rulers
Shows/hides the rulers.
For more information see Document - Working with a Document -
Rulers and Grid.
 Grid
Grid
Shows/hides the grid.
For more information see Document - Working with a Document -
Rulers and Grid.
 Guides
Shows/hides the guide lines.
For more information see Document - Working with a Document -
Guide Lines and Gluing.
 Page Breaks
Lets you choose to show/hide the page breaks for the documents. (Page breaks
are gray lines which mark the non-printable areas and show the borders of the
print pages).
For more information see Document - Printing
a Document.
 Connection Points
Shows/hides the connection points of shapes (they remain active even when hidden).
For more information see Shapes - Connecting Shapes - Connection
Points.
Connection Points in Groups
Shows/hides the connection points of shapes in groups.
For more information see Shapes - Connecting Shapes - Connection
Points, Shapes - Operations on Shapes - Grouping
and Ungrouping.
Floating Dialogs
This menu controls which floating dialogs are displayed.
The check mark  besides the menu items
indicates that the floating dialog is active and is displayed either as a floating
window, or as a tab in one of the floating windows. Clicking on a menu item
displays the dialog if it was hidden, or hides it if it was visible.
besides the menu items
indicates that the floating dialog is active and is displayed either as a floating
window, or as a tab in one of the floating windows. Clicking on a menu item
displays the dialog if it was hidden, or hides it if it was visible.
Line
Shows/hides the Line floating dialog.
For more information see Dialogs - Floating Dialogs - Line.
Fill & Shadow
Shows/hides the Fill & Shadow floating dialog.
For more information see Dialogs - Floating Dialogs
- Fill & Shadow.
Protection
Shows/hides the Protection floating dialog.
For more information see Dialogs - Floating Dialogs
- Protection.
Behavior
Shows/hides the Behavior floating dialog.
For more information see Dialogs - Floating Dialogs
- Behavior.
Double-Click
Shows/hides the Double-Click floating dialog.
For more information see Dialogs - Floating Dialogs
- Double-Click.
Information
Shows/hides the Information floating dialog.
For more information see Dialogs - Floating Dialogs
- Information.
Layers
Shows/hides the Layers floating dialog.
For more information see Dialogs - Floating Dialogs
- Layers.
Pages
Shows/hides the Pages floating dialog.
For more information see Dialogs - Floating Dialogs
- Pages.
Geometry
Shows/hides the Geometry floating dialog.
For more information see Dialogs - Floating Dialogs
- Geometry.
Show/Hide
Shows/hides all active floating dialogs.
 Toolbars
This menu controls which toolbars are displayed. The check mark
besides the menu items indicates that the toolbar is displayed.
For more information see Toolbars.
Toolbars -> Main
Shows/hides the Main toolbar.
For more information see Toolbars - Main.
Toolbars -> Drawing Tools
Shows/hides the Drawing Tools toolbar.
For more information see Toolbars - Drawing
Tools.
Toolbars -> Formatting
Shows/hides the Formatting toolbar.
For more information see Toolbars - Formatting.
Toolbars -> Text
Shows/hides the Text toolbar.
For more information see Toolbars - Text.
Toolbars -> Arrange & Make Same
Shows/hides the Arrange & Make Same toolbar.
For more information see Toolbars - Arrange
& Make Same.
Toolbars -> Action
Shows/hides the Action toolbar.
For more information see Toolbars - Action.
Toolbars -> Connect Shapes
Shows/hides the Connect Shapes toolbar.
For more information see Toolbars - Connect
Shapes.
Toolbars -> Snap & Glue
Shows/hides the Snap & Glue toolbar.
For more information see Toolbars - Snap
& Glue.
Toolbars -> Zoom
Shows/hides the Zoom toolbar.
For more information see Toolbars - Zoom.
Toolbars -> View
Shows/hides the View toolbar.
For more information see Toolbars - View.
Toolbars -> Libraries
Shows/hides the Libraries toolbar.
For more information see Toolbars - Libraries.
Toolbars -> Pages
Shows/hides the Pages toolbar.
For more information see Toolbars - Pages.
Toolbars -> Layers
Shows/hides the Layers toolbar.
For more information see Toolbars - Layers.
Toolbars -> Routing
Shows/hides the Routing toolbar.
For more information see Toolbars - Routing.
Toolbars -> CD Basic
Shows/hides the CD Basic toolbar.
For more information see Toolbars - Basic.
Toolbars -> Web
Shows/hides the Web toolbar.
For more information see Toolbars - Web.
Toolbars -> Customize
Calls the Customize dialog where you can set the view of toolbars.
For more information see Dialogs - Modal dialogs - Customize.
Libraries Window
This menu is used to display, hide and change the appearance of the library
window.
Libraries Window -> Show
Shows/hides the library window.
For more information see Libraries,
Windows - Library.
 Libraries Window ->
View as Icons
Libraries Window ->
View as Icons
Shows shapes in the library window as icons.
For more information see Libraries,
Windows - Library.
 Libraries Window ->
View as Text
Libraries Window ->
View as Text
Shows only the names of the shapes in the library window.
For more information see Libraries,
Windows - Library.
 Libraries Window ->
View as Icons and Text
Libraries Window ->
View as Icons and Text
Shows both the names and the icons of the shapes in the library window.
For more information see Libraries,
Windows - Library.
Status Bar
Displays/hides the status bar. If the check mark
besides the menu item is enabled, the status bar is visible.
| Windows |
Mac OS |
 |
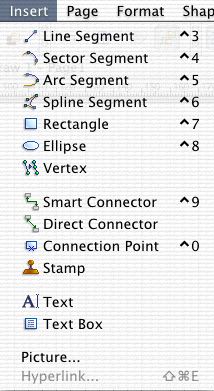 |
In this menu you can choose drawing tools, insert picture, hyperlinks and OLE objects (Windows version only).
 Line Segment
Activates the Line tool mode and lets you draw lines and manipulate
vertices of shapes.
For more information see Shapes - Drawing a Shape
with Drawing Tools.
 Sector Segment
Activates the Sector tool mode and lets you draw circular sectors,
manipulate vertices of shapes, and change the curvature of segments.
For more information see Shapes - Drawing a Shape
with Drawing Tools.
 Arc Segment
Activates the Arc tool mode and lets you draw elliptic arc
segments, manipulate vertices of shapes and change the curvature of segments.
For more information see Shapes - Drawing a Shape
with Drawing Tools.
 Spline Segment
Activates the Spline tool mode and lets you draw smooth curves
(splines), and also manipulate vertices of shapes and change the curvature of
spline segments.
For more information see Shapes - Drawing a Shape
with Drawing Tools.
 Rectangle
Activates the Rectangle tool mode and lets you draw rectangle
boxes, and also move and resize shapes.
For more information see Shapes - Drawing a Shape
with Drawing Tools.
 Ellipse
Activates the Ellipse tool mode and lets you draw ellipses,
and also move and resize shapes.
For more information see Shapes - Drawing a Shape
with Drawing Tools.
 Vertex
Activates the Insert Vertex tool which lets you insert and
manipulate the vertices of shapes.
For more information see Shapes - Operations on Shapes - Reshaping.
 Smart Connector
Activates the Smart Connector tool mode and lets you draw smart
connectors.
For more information see Shapes - Connecting Shapes
- Connectors.
 Direct Connector
Activates the Direct Connector tool mode and lets you draw
direct connectors.
For more information see Shapes - Connecting Shapes
- Connectors.
 Connection Point
Activates the Connection Point tool mode which lets you insert
and manipulate connection points of shapes.
For more information see Shapes - Connecting Shapes
- Connection Points.
 Stamp
Stamp
Activates the Stamp tool: if there is a shape selected in the
document or in the library, you can insert this shape into the document by a
single click on the page.
For more information read Shapes - Operations on Shapes - Duplicating,
Libraries - Using Libraries and Library Shapes.
 Text
Text
Activates the Edit Text tool mode which lets you edit the text
of the shape, and also create new "Text" shapes.
For more information see Shapes - Drawing a Shape
with Drawing Tools.
 Text Box
Activates the Text Box tool mode which lets you reposition
the text with respect to the shape to which this text is assigned.
For more information see Text - Repositioning
Text.
Picture...
Inserts a picture into the document.
For more information see Shapes - Pictures.
Hyperlink...
Lets you assign a hyperlink to the selected shape.
For more information see Internet - Using
Hyperlinks.
Object...(Windows only)
Inserts an OLE-object.
For more information see OLE-Objects.
| Windows |
Mac OS |
 |
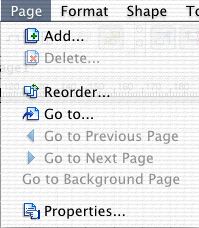 |
This menu is used to work with pages of the document.
 Add
Add
Adds a page to the active document.
For more information see Document - Working with Pages - Adding
a Page.
 Delete
Deletes the selected page from the document.
For more information see Document - Working with Pages - Deleting
a Page.
 Reorder
Changes the order of pages in the active document.
For more information see Document - Working with Pages - Reordering
Pages.
 Go to...
Goes to the specified page.
For more information see Document - Working with Pages - Going
to Another Page.
 Go to Previous Page
Goes to the previous page.
For more information see Document - Working with Pages - Going
to Another Page.
 Go to Next Page
Goes to the next page.
For more information see Document - Working with Pages - Going
to Another Page.
Go to Background Page
Goes to the background page.
For more information see Document - Working with Pages - Background
Pages.
 Properties...
Allows to change the page properties in the Page Properties
dialog (change name, make background, assign a background page).
For more information about the Page Properties dialog
see Dialogs - Modal Dialogs - Add Page/Page
Properties.
| Windows |
Mac OS |
 |
 |
This menu is used to change various parameters of shapes (line style, fill, shadow, text).
Shape Properties
Calls the Shape Properties dialog where you can change various
properties of shapes.
For more information see Shapes - Shape Properties,
Dialogs - Modal Dialogs - Shape Properties.
Text...
Calls the Text Properties dialog for formatting text.
For more information see Text - Formatting
Text.
Hyperlink
The menu for working with hyperlinks.
| Windows |
Mac OS |
 |
 |
Hyperlink -> Open
Opens the hyperlink. Depending on the hyperlink type, this command may open
another document page, open another document, launch another application or
open a Web page in the Web browser.
For more information see Internet - Using
Hyperlinks.
Hyperlink -> Edit...
Edits hyperlink in the Hyperlink dialog.
For more information see Internet - Using
Hyperlinks, Dialogs - Modal Dialogs - Hyperlink.
Hyperlink -> Remove
Removes the selected shape's hyperlink.
For more information see Internet - Using
Hyperlinks.
Define Styles...
Calls a dialog where you can define named styles.
For more information see Shapes - Defining and
Using Named Styles.
Custom Properties...
Allows to set custom properties to the shape.
For more information see Shapes - Custom Properties.
| Windows |
Mac OS |
 |
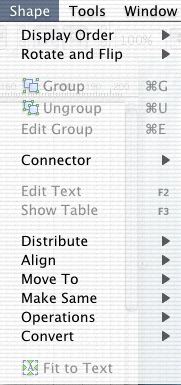 |
The commands in this menu allow you to group shapes, change their display order and make various operations on them.
Display Order
This menu determines the display order of shapes in the document.
| Windows |
Mac OS |
 |
 |
 Display Order -> Send to Back
Puts the selected shapes behind all other shapes.
For more information see Shapes - Operations on Shapes - Changing
the Front-to-Back Order.
 Display Order -> Bring to
Front
Display Order -> Bring to
Front
Puts the selected shapes above all other shapes.
For more information see Shapes - Operations on Shapes - Changing
the Front-to-Back Order.
Display Order -> Send Backward
Positions selected shapes one step lower in the order list.
For more information see Shapes - Operations on Shapes - Changing
the Front-to-Back Order.
Display Order -> Bring Forward
Positions selected shapes one step higher in the order list.
For more information see Shapes - Operations on Shapes - Changing
the Front-to-Back Order.
Rotate and Flip
This menu contains commands for rotating and flipping shapes.
| Windows |
Mac OS |
 |
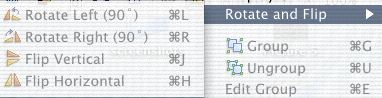 |
 Rotate and Flip -> Rotate
Left(90°)
Rotate and Flip -> Rotate
Left(90°)
Rotates selected shapes by 90° counterclockwise.
For more information see Shapes - Operations on Shapes - Rotating
and Flipping.
 Rotate and Flip -> Rotate
Right(90°)
Rotate and Flip -> Rotate
Right(90°)
Rotates selected shapes by 90° clockwise.
For more information see Shapes - Operations on Shapes - Rotating
and Flipping.
 Rotate and Flip -> Flip
Vertical
Rotate and Flip -> Flip
Vertical
Replaces the selected shape with its vertically mirrored copy.
For more information see Shapes - Operations on Shapes - Rotating
and Flipping.
 Rotate and Flip -> Flip
Horizontal
Rotate and Flip -> Flip
Horizontal
Replaces the selected shape with its horizontally mirrored copy.
For more information see Shapes - Operations on Shapes - Rotating
and Flipping.
 Group
Group
Groups selected shapes.
For more information see Shapes - Operations on Shapes - Grouping
and Ungrouping.
 Ungroup
Ungroups selected shapes.
For more information see Shapes - Operations on Shapes - Grouping
and Ungrouping.
Edit Group
Opens a new window in which you can edit shapes inside a group without ungrouping
it.
For more information see Shapes - Operations on Shapes - Grouping
and Ungrouping.
Connector
This menu contains commands for working with connectors.

Connector -> Reverse Link
Changes the direction of the connector (exchanges its begin and end points).
For more information see Shapes - Connecting
Shapes.
 Connector
-> Disable Auto-Routing
Connector
-> Disable Auto-Routing
Enables/disables automatic routing for the smart connector.
For more information see Shapes - Connecting Shapes - Smart
Connector.
 Connector -> Flow Around
Objects
Connector -> Flow Around
Objects
Specifies whether smart connectors can flow around shapes on their way.
For more information see Shapes - Connecting Shapes - Smart
Connector.
Edit Text
Edits text of the selected shape.
For more information see Text - Adding Text
to a Shape.
Show Table
Displays the shape parameter table.
For more information see Shape Parameter Table.
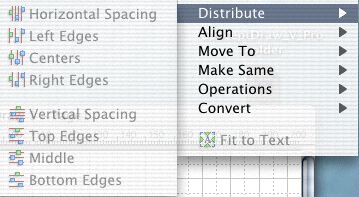
Distribute
This menu allows you to create equal spacing between selected shapes.
| Windows |
Mac OS |
 |
 |
 Distribute -> Horizontal Spacing
Creates uniform horizontal spacing between the alignment boxes of the selected
shapes.
For more information see Shapes - Operations on Shapes - Distributing
Shapes.
 Distribute -> Left Edges
Creates uniform spacing between the left edges of the alignment boxes of the
selected shapes.
For more information see Shapes - Operations on Shapes - Distributing
Shapes.
 Distribute -> Centers
Creates uniform horizontal spacing between the centers of the alignment boxes
of the selected shapes.
For more information see Shapes - Operations on Shapes - Distributing
Shapes.
 Distribute -> Right Edges
Creates uniform spacing between the right edges of the alignment boxes of the
selected shapes.
For more information see Shapes - Operations on Shapes - Distributing
Shapes.
 Distribute -> Vertical
Spacing
Distribute -> Vertical
Spacing
Creates uniform vertical spacing between the alignment boxes of the selected
shapes.
For more information see Shapes - Operations on Shapes - Distributing
Shapes.
 Distribute -> Top Edges
Creates uniform spacing between the top edges of the alignment boxes of the
selected shapes.
For more information see Shapes - Operations on Shapes - Distributing
Shapes.
 Distribute -> Middle
Creates uniform vertical spacing between the centers of the alignment boxes
of the selected shapes.
For more information see Shapes - Operations on Shapes - Distributing
Shapes.
 Distribute -> Bottom Edges
Creates uniform spacing between the bottom edges of the alignment boxes of the
selected shapes.
For more information see Shapes - Operations on Shapes - Distributing
Shapes.
Align
This menu contains commands for aligning two or more selected shapes.
 Align -> Left
Aligns selected shapes on the left sides relative to the primary selected shape.
For more information see Shapes - Operations on Shapes - Aligning
Shapes.
 Align -> Center
Aligns selected shapes horizontally on the centers relative to the primary selected
shape.
For more information see Shapes - Operations on Shapes - Aligning
Shapes.
 Align -> Right
Aligns selected shapes on the right sides relative to the primary selected shape.
For more information see Shapes - Operations on Shapes - Aligning
Shapes.
 Align -> Top
Aligns selected shapes on the top sides relative to the primary selected shape.
For more information see Shapes - Operations on Shapes - Aligning
Shapes.
 Align -> Middle
Aligns selected shapes vertically on the centers relative to the primary selected
shape.
For more information see Shapes - Operations on Shapes - Aligning
Shapes.
 Align -> Bottom
Aligns selected shapes on the bottom sides relative to the primary selected
shape.
For more information see Shapes - Operations on Shapes - Aligning
Shapes.
Move To
This menu lets you center selected shapes on the page.
Move To -> Center Page
Positions the selected shape(s) in the center of the document page.
Move To -> Center Vertically
Changes the vertical position of the selected shapes moving them to the center
of the page.
Move To -> Center Horizontally
Changes the horizontal position of the selected shapes moving them to the center
of the page.
Make Same
Makes some attributes of shapes the same as the attributes of the primary selected
shape.
 Make Same -> Style
Copies visual attributes of the primary selected shape to other selected shapes.
For more information see Shapes - Operations on Shapes - Copying
Shape's Visual Attributes.
 Make Same -> Width
Makes the selected shapes the same width as the primary selected shape.
For more information see Shapes - Operations on Shapes - Copying
Shape's Visual Attributes.
 Make Same -> Height
Makes the selected shapes the same height as the primary selected shape.
For more information see Shapes - Operations on Shapes - Copying
Shape's Visual Attributes.
 Make Same -> Size
Makes the selected shapes the same size as the primary selected shape.
For more information see Shapes - Operations on Shapes - Copying
Shape's Visual Attributes.
Operations
The commands from this menu allow you to combine several shapes in one or separate
shapes to individual segments. 
Operations -> Combine
Combines several selected shapes into one.
For more information see Shapes - Operations on Shapes - The
Join, Combine and Separate Operations.
Operations -> Join
Joins several selected shapes so that they form a single geometry.
For more information see Shapes - Operations on Shapes - The
Join, Combine and Separate Operations.
Operations -> Separate
Splits the selected complex shape into separate geometries, so that each geometry
becomes a separate shape.
For more information see Shapes - Operations on Shapes - The
Join, Combine and Separate Operations.
Convert
Converts selected shapes to the Vector Picture format and vice versa.

Convert -> To Vector Picture
Converts selected shapes or groups into a vector picture.
For more information see Shapes - Pictures - Vector
Pictures.
Convert -> To Group
Converts a vector picture into a group of ConceptDraw shapes.
For more information see Shapes - Pictures - Vector
Pictures.
 Fit to Text
Resizes the selected shapes according to the dimensions of the text they contain.
For more information see Text - Adjusting
a Shape's Size to Fit Its Text.
This menu contains various tools.
| Windows |
Mac OS |
|
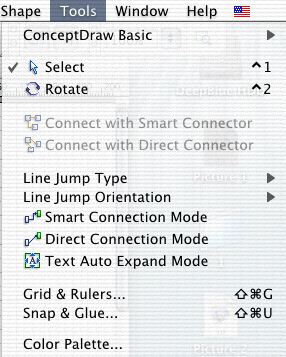 |
ConceptDraw Basic
Contains commands for editing ConceptDraw Basic scripts.
Application Script
For application-level scripts.
Application Script -> Edit
Edits an application-level script.
For more information see ConceptDraw Basic.
Application Script -> Remove
Removes an application-level script.
For more information see ConceptDraw Basic.
Document Script
For document-level scripts.
Document Script -> Edit
Edits a document-level script.
For more information see ConceptDraw Basic.
Document Script -> Remove
Removes a document-level script.
For more information see ConceptDraw Basic.
Page Script
For page-level scripts.
Page Script -> Edit
Edits a page-level script.
For more information see ConceptDraw Basic.
Page Script -> Remove
Removes a page-level script.
For more information see ConceptDraw Basic.
Shape Script
For shape-level scripts.
Shape Script -> Edit
Edits a shape-level script.
For more information see ConceptDraw Basic.
Shape Script -> Remove
Removes a shape-level script.
For more information see ConceptDraw Basic.
 Select
Activates the Select tool mode.
For more information see Shapes - Operations on Shapes - Selecting
and Shapes - Operations on Shapes - Moving.
 Rotate
Activates the Rotate tool mode and lets you rotate shapes.
For more information see Shapes - Operations on Shapes - Rotating
and Flipping.
 Connect with Smart Connector
Connects the selected shapes to the primary selected shape, using the smart
connectors.
For more information see Shapes - Connecting Shapes - Smart
Connector, Shapes - Connecting Shapes - Connecting
Multiple Shapes.
 Connect with Direct Connector
Connects the selected shapes to the primary selected shape, using the direct
connectors.
For more information see Shapes - Connecting Shapes - Direct
Connector, Shapes - Connecting Shapes - Connecting
Multiple Shapes.
Line Jump Type
This menu specifies how the points in which smart connectors cross look like.

 Line Jump Type -> Square
Displays a square crossing.
For more information see Shapes - Connecting Shapes - Smart
Connector.
 Line Jump Type -> Arc
Displays an arc crossing.
For more information see Shapes - Connecting Shapes - Smart
Connector.
 Line Jump Type -> 2 Sides
Displays a crossing made up of two lines.
For more information see Shapes - Connecting Shapes - Smart
Connector.
Line Jump Type -> 3 Sides
Displays a crossing made up of three lines.
For more information see Shapes - Connecting Shapes - Smart
Connector.
Line Jump Type -> Gap
Displays a gap on crossing.
For more information see Shapes - Connecting Shapes - Smart
Connector.
Line Jump Orientation
Specifies the orientation of line crossings.

 Line Jump Orientation ->
Horizontal Jumps
Line Jump Orientation ->
Horizontal Jumps
The line crossings will be displayed on the horizontal lines.
For more information see Shapes - Connecting Shapes - Smart
Connector.
 Line Jump Orientation ->
Vertical Jumps
Line Jump Orientation ->
Vertical Jumps
The line crossings will be displayed on the vertical lines.
For more information see Shapes - Connecting Shapes - Smart
Connector.
 Line Jump Orientation -> No
Jumps
Line Jump Orientation -> No
Jumps
No line jumps are displayed.
For more information see Shapes - Connecting Shapes - Smart
Connector.
 Smart Connection Mode
Activates the Smart Connection mode in which every new shape
gets connected automatically to the previously selected shape with a smart connector.
For more information see Shapes - Connecting Shapes - Smart
Connector, Shapes - Connecting Shapes - Auto-Connection
Modes.
 Direct Connection Mode
Activates the Direct Connection mode in which every new shape
gets connected automatically to the previously selected shape with a direct
connector.
For more information see Shapes - Connecting Shapes - Direct
Connector, Shapes - Connecting Shapes - Auto-Connection
Modes.
 Text Auto Expand Mode
Activates the Text Auto Expand mode in which any shape is resized
automatically when you add text to it.
For more information see Text - Text Auto-Expand
Mode.
Grid & Rules
Calls the Grid & Rulers dialog, where you can change the
parameters for the grid and rulers.
For more information see Dialogs - Modal Dialogs - Grid
& Rulers.
Snap & Glue
Allows to modify snapping and gluing parameters for shapes.
For more information see Dialogs - Modal Dialogs - Snap
& Glue, Document - Working with a Document - Guide
Lines and Gluing.
Color Palette
Calls the Palette dialog, where you can save or load the 256-color
palette for the document.
For more information see Dialogs - Modal Dialogs - Palette.
This menu contains commands for manipulating windows, and shows the list of open windows.
| Windows |
Mac OS |
 |
 |
For more information see Customizing the Working Environment - Working with Windows.
New Window
Opens the active document in a new window.
For more information see Customizing the Working Environment - Working
with Windows.
Cascade (Windows only)
Arranges all the open windows so that each next window appears slightly down
and to the right from the previous one.
For more information see Customizing the Working Environment - Working
with Windows.
Tile Horizontally
Arranges all the open windows horizontally as non-overlapping tiles.
For more information see Customizing the Working Environment - Working
with Windows.
Tile Vertically
Arranges all the open windows vertically as non-overlapping tiles.
For more information see Customizing the Working Environment - Working
with Windows.
Close Window
Closes the active window.
For more information see Customizing the Working Environment - Working
with Windows.
Close All
Closes all open windows in the program.
For more information see Customizing the Working Environment - Working
with Windows.
Minimize Window(Òîëüêî Mac OS)
Minimizes the active window.
For more information see Customizing the Working Environment - Working
with Windows.
Zoom Window(Òîëüêî Mac OS)
Maximizes the active window to full screen.
For more information see Customizing the Working Environment - Working
with Windows.
From this menu you can get reference information.
| Windows |
Mac OS |
 |
 |
ConceptDraw Help
Calls ConceptDraw help system.
Tutorial
Opens brief tutorial about ConceptDraw.
XML Reference
Calls reference information about XML for ConceptDraw.
About ConceptDraw V... (Windows only![]() )
)
Displays a window with information about the program and its developers.
Product Web Site
Opens ConceptDraw web site in the Web browser.
Online Registration
Goes to the online registration page.
Get Latest Update
Goes to the Updates page of the Web site.